Mostrando entradas con la etiqueta Weblogic. Mostrar todas las entradas

martes, 23 de julio de 2019

WebLogic Plug-In Enabled Parameter

Cuando usamos un proxy delante de nuestro servidor WebLogic, hay que indicarle a WebLogic que se está usando ya que dicho proxy capturará las solicitudes y cambiará ciertos aspectos de la llamada que WebLogic no sabrá interpretar o se esperará un funcionamiento no deseado.

Para ello existe la opción WebLogic Plug-In Enabled. Activando esta opción le estamos diciendo a WebLogic que existe un proxy server que está capturando las llamadas que le van a llegar. Sino incurrimos en errores como el que nos estaba pasando, que estábamos usando SSL y WebLogic nos devolvía la llamada por http en vez de por https que era como la estábamos solicitando (Mixed content: The page X was loaded over HTTPS, but requested an insecure RESOURCE. This content should also be served over HTTPS). En concreto esto es lo que hace WebLogic cuando activamos dicha opción:

The WLS setting “WebLogic plugin Enabled” when set to true informs the WLS of the presence of the proxy. With this setting is enabled, WLS sets the proprietary WL-Proxy-Client-IP header and consequently calls to getRemoteAddr will return the address of the browser client from the WL-Proxy-Client-IP header instead of the address of the web server.

Se puede activar en 3 niveles, en orden restrictivo decreciente: dominio, cluster o manejado. En nuestro caso la activamos para un servidor manejado de WebCenter, por lo que debemos navegar hasta el servidor en concreto, pestaña Configuración, sub-pestaña General y abrir la opción Avanzada. Una vez guardados los cambios, debemos reiniciar el servidor en cuestión.

Server_WLS_Plugin_Enabled

jueves, 18 de julio de 2019

Configuración plugin Weblogic para Apache 2.4

Nos hemos encontrado un problema a la hora de instalar el plugin para Weblogic en un Apache 2.4 siguiendo la documentación oficial (https://docs.oracle.com/middleware/1212/webtier/PLGWL/apache.htm#PLGWL395). Una vez descomprimido, puesto el módulo en la carpeta modules, y cargado el módulo en el httpd.conf, nos aparece el siguiente error:

"Cannot load /PATH_APACHE/wls_plugin/lib/mod_wl_24.so into server: libopmnsecure.so: cannot open shared object file: No such file or directory".

El problema parece estar en las librerías que usa el plugin, que el sistema no es capaz de leer. En Linux existe un fichero donde se especifican las librerías que usan los programas que se compilan y ejecutan, y en nuestro caso en un RH está en /etc/ld.so.conf

Lo único que hay que añadir en dicho directorio la ruta a la carpeta donde están las librerías del plugin de Weblogic para apache (/PATH_APACHE/wls_plugin/lib).

vi /etc/ld.so.conf => Añadir línea al fichero con la ruta

Una vez guardado, hay que decirle al sistema que cargue de nuevo en cache la lista de librerías que usa, para ello usamos el comando ldconfig:

ldconfig creates the necessary links and cache to the most recent shared libraries found in the directories specified on the command line, in the file /etc/ld.so.conf, and in the trusted directories (/lib and /usr/lib).

Una vez hecho esto, reiniciamos el Apache y ya debe estar funcionando.


miércoles, 20 de febrero de 2019

Atributo ClearCacheOnCommit en ADF

En un desarrollo reciente disponemos de una tabla ADF con varios registros, basado en un VO Entity updatable en donde se puede operar con acciones CreateInsert y Delete, con su posterior Commit, cada row con un atributo PK independiente.

Nos surgió la problemática de que, sin salir de la taskflow, al realizar el CreateInsert y a continuación realizar el Delete de esa misma row (con las opciones out of the box de binding mediante getCurrent) veíamos como se borraba de la tabla pero no de base de datos.

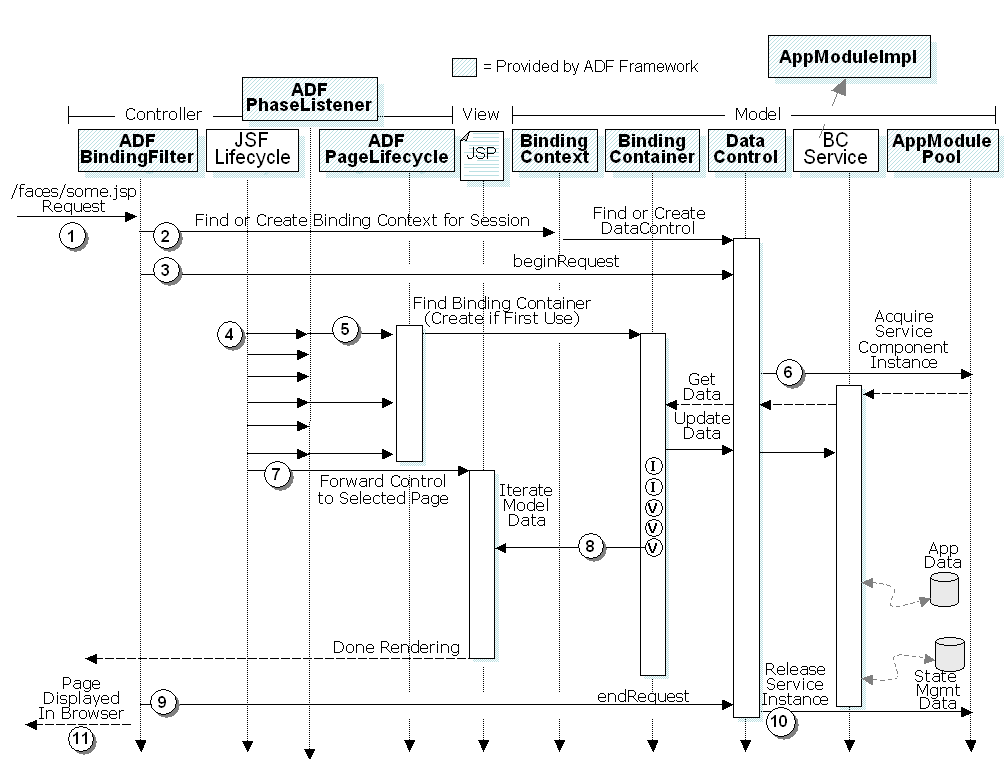
¿Cual era el problema? Para explicarlo mostramos el ciclo de vida de ADF:

Resultado de imagen de create insert delete adf diagram binding 


Cuando se realiza la operación CreateInsert, se inserta y accede al binding correspondiente, se accede al AppModule y se inserta en base de datos, pero no se actualiza el datacontrol con dicha información, es decir, se inserta la row en el iterator pero no ha refrescado con la PK que ha devuelto la base de datos, por lo que la row insertada y que se ve en la tabla no tiene actualizado el campo PK devuelto por el modelo.
Como se puede deducir, si no refrescas el iterator o pides de nuevo los datos a la base de datos, esa row no se actualiza con su verdadero PK por lo que al borrar inmediatamente después lo va a borrar del iterator pero no de base de datos.

La solución consiste en usar el atributo ClearCacheOnCommit en el fichero AppModule de nuestra aplicación:


Dicho atributo permite refrescar los VO después de realizar la operación Commit, por lo que siempre vamos a tener en este caso deseablemente el valor introducido en base de datos.
Si no se refleja esta variable en el AppModule, por defecto no aparecerá y tomará el valor "false", como se indica en la documentación (esto es del método isClearCacheOnCommit de la interfaz Transaction para consultar dicho valor):

isClearCacheOnCommit

public boolean isClearCacheOnCommit()
Returns the flag indicating whether all Entity Object caches will be cleared after the transaction is committed.After the transaction is committed, the value of this flag is used to determine whether the Entity Object caches are cleared or not. If this flag value is false, the cache contents are kept. In this case, the cache may contain data that is stale in that it does not match the newest data (changes made by another user and committed).
If this flag is true, the caches are cleared after the transaction is committed. When the user brings in data by traversing row collection, the latest data from the database will be brought into Entity caches.
Returns:
the current value of clear-cache-on-commit flag.
See Also:
RowSet.executeQuery(), setClearCacheOnCommit(boolean val)


viernes, 11 de enero de 2019

Integración BPM con WCC

Se plantea la posibilidad de integrar BPM con WCC, de tal manera que al realizar, por ejemplo, un checkin de un documento, lance un proceso de aprobación.

Apoyándonos en la siguiente documentación (https://blogs.oracle.com/practicalbpm/webcenter-content-ucm-bpm-integration, y en https://docs.oracle.com/cd/E21764_01/doc.1111/e16759/toc.htm) permitimos dicha integración.

1. Prepare the UCM environment for integration with SOA. 

This step is only required when the
UCM and SOA domains were created separately and the UCM domain is not extended
for SOA.

a. Copy the “soa” folder from SOA_ORACLE_HOME to UCM_ORACLE_HOME
For example: Copy D:\Oracle\Middleware\Oracle_SOA1\soa to D:\Oracle\Middleware\Oracle_UCM1\soa

b. Update the class path in setDomainEnv on the UCM server

Windows:
Edit setDomainEnv.cmd in
%DOMAIN_HOME%\bin

Add :  set POST_CLASSPATH=%ORACLE_HOME%\soa\modules\oracle.soa.mgmt_11.1.1\soa-infra-mgmt.jar;%POST_CLASSPATH%
UNIX
Edit SetDomainEnv.sh in
$DOMAIN_HOME/bin
Add: POST_CLASSPATH="${ORACLE_HOME}/soa/modules/oracle.soa.mgmt_11.1.1/soa-infra-mgmt.jar${CLASSPATHSEP}${POST_CLASSPATH}"

c. Enable Cross Domain Security
Perform the following steps in both UCM and SOA console
1. Login to the Weblogic server console (http://localhost:7001/console/)
2. Select the domain name under Domain Structure. Navigate to the Security Tab
3. Check “Cross Domain Security Enabled”


4. Enter the same credential for both UCM and SOA
d. Restart the servers 

2. Enable UCM-BPEL Integration Component

a. Login to content server, navigate to the Admin Server
b. Select component manager for the server on which the component needs to be installed

c. Click on “Advanced Component Manager” and enable the BPELIntegrationComponent


d. Login to the Weblogic Administration console of UCM. Navigate to servers, select the UCM server and click Restart SSL.


3. Configure connection to SOA server

a. Navigate to Administration -> Oracle BPEL Administration -> Connection Configuration

b. From the “Connection Menu” select Add connection
Enter the following credentials

Note: The Provider URL contains the SOA server’s hostname and port.
You can test this be running the wlst script in the SOA server and connect to t3://servername:[port]
c. Test the connection. If successful you should see the following screen. Revisit   steps 1 – 3 if there is an error.


4. Process Configuration

a. Navigate to Administration -> Oracle BPEL Administration -> Process Configuration
b. From the process menu select “Add Process”
c. Select the BPM/BPEL process from the drop down

d. Click Save
e. Go to Actions “Upload Payload” Map the process input fields to the Metadata fields in UCM
Añadir leyenda

  
5. Update the SOA composite to enable UCM integration

a. Add the following line to Composite.xml in the SOA/BPM project as shown
<binding.adf serviceName="YourUniqueServiceName" registryName=""/>
 

6. Configure Workflow in UCM 

a. Login to content server
b. Navigate to Administration -> Admin Applets
c. Launch the Workflow Admin Applet
d. Add a new Workflow criteria


e. Click on edit criteria workflow. The following screen is where the event trigger condition is set. In this case the workflow will be triggered for Document Type that matches “Document”


f. Edit initiateprocess
g. Add the users that have access to the workflow and document check in for which the workflow is triggered
 

h. Add the following lines under Exit conditions
wfGet("conversationId") and 
obIsInstanceClosed("BPEL", wfGet("conversationId"))
 

i. On Events tab click Edit for Entry. Add the line <$wfReleaseDocument()$> before <$endif$> to automatically approve the document. If you do not add this step the document state will be
“Pending” and the user has to manually go to Content Management -> Active Workflows -> My Workflow Assignments to approve the document.
<$if not conversationId$>
<$obConfigID="BPEL"$>
<$obInvokeProcess(obConfigID)$>
<$endif$>


7. Login as sysadmin ( the user from step 6)

Check in a document of Type Document trigger condition in step 6) and verify if the BPM/BPEL process is instantiated.
 
Trouble shooting
  1. Cross domain security – If
    the cross domain security is configured incorrectly you will see the
    following error:
vax.xml.ws.WebServiceException: java.lang.SecurityException: [Security:090398]
Invalid Subject: principals=[weblogic, Administrators]
  at com.sun.xml.ws.client.dispatch.DispatchImpl.doInvoke(DispatchImpl.java:209)
 
  1. Enabling UCM System Audit to trace BPEL
    Integration related errors
Navigate to Administration->System Audit Information and add the BPEL integration component under “Tracing Sections Information”. Update and click “View Server Output” to view the detailed logs. 

3. Complex Types as BPEL/BPM process input. With the current release of Webcenter Content (11.1.1.6) UCM does not process the complex type as the process input and the “Update Payload” action will give and error. The work around is to use a simple type as input.

viernes, 13 de mayo de 2016

Error al desplegar aplicación ADF en Weblogic nuevo

Cuando hemos montado un Weblogic que albergará aplicaciones ADF, la primera vez que intentamos desplegar nos aparece el error siguiente:

Error while processing library references. Unresolved application library references, defined in weblogic-application.xml: [Extension-Name: adf.oracle.domain, exact-match: false]

Esto es porque hay librerias de ADF de Weblogic que no se han aplicado a todos los destinos (en concreto al manejado de ADF). Para ello debemos asegurarnos que las siguientes librerías tengan aplicado como destino tanto el nodo Admin como el manejado:

  • adf.oracle.domain
  • adf.oracle.businesseditor
  • adf.oracle.domain.webapp
  • jstl
  • jsf
La aplicación del destino se realiza en la siguiente pestaña de la librería (en Deployments) en concreto: